Locate/CWSerenade Configuration (Order Broker)

Purpose: This topic describes the required setup to integrate CWSerenade with Locate, and how to load item and inventory information from CWSerenade into the Locate database.
Default system? When you begin setting up data in Locate, you build a location group of integrated systems, such as your CWSerenade company and your POS system. If your CWSerenade company is the default system, or system of record, in Locate, then when you import your CWSerenade item and SKU records into Locate, they serve as the master products, and the product records imported from other systems reference the CWSerenade items and SKUs. The CWSerenade item and SKU code is the product code in Locate, and the product codes from other integrated systems are system products that reference the product code from the default system.
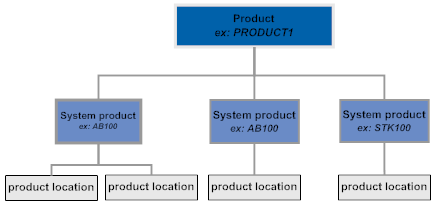
If CWSerenade is not the default system in Locate, then each item and SKU sent to Locate needs to reference the product code from the default system. If the systems use different product codes, you can use a secondary field in CWSerenade, such as the Reference number or a UPC code, to store the Locate product code, so that the CWSerenade system product is correctly linked to the default system’s product code during the import process. The Locate Product Code ID (K66) system control value indicates whether the CWSerenade item and SKU, or some other field, contains the default system’s product code.
For more information: See:
• background on integration between Locate and CWSerenade: the Locate Order Broker Integration Overview
• details on the order types, processing, and messages: Order Broker Integration
• instructions on setting up data in Locate: the Setting Up Data for the Order Broker Module topic in the Locate online help
• instructions on setup required for integration with Locate’s Supplier Direct Fulfillment module: Interface with Locate’s Supplier Direct Fulfillment Module: Overview and Setup
Version compatibility: Release 5.0 of CWSerenade is compatible with release 5.0 or higher of Locate. Integration with release 3.0 or 3.1 of Locate is also supported, although features added since that release, such as the ability to send held orders to Locate, are not available.
In this topic:
• Order Broker-Related System Control Values
• WSDL Location (version 5.0 or higher)
• Endpoint URL’s (version 3.0 or 3.1)
• Setting the Daily Status Inquiry Time Window (all versions)
• Additional Locate Setup in CWSerenade
• Notes on Configuration in Locate
Order Broker-Related System Control Values

Most of the system control values related to integration with Locate’s Order Broker are available through the Order Broker Values (K15) umbrella screen. See that screen for more information.
Special orders system control values: The following system control values are required to process special ship-to-store orders:
• Order Type for Special Orders (L15): Identifies the order type code that indicates to send the e-commerce order number, rather than the CWSerenade order number, as the order ID when submitting the ship-to-store order to the Order Broker. Since special ship-to-store orders originate in the retail location, they are identified primarily by the store system’s original order number.
• Pay Type for Special Orders (L16): Identifies the pay type that indicates that the customer needs to pay for a ship-to-store order when picking it up at the retail location. When a ship-to-store order uses this pay type, the Submit Order message indicates a balance_due that is the same as the order total.
• Store Pickup Confirmation Email Program (L48): Use this system control value to specify the program that generates a notification to the customer when a store pickup order is ready for pickup.
Additional system control values:
• To avoid an error in order entry, do not set the Default Previous Pay Type in Order Entry (D64) system control value to ALL; otherwise, the Order Broker Payment Type (K98) might default in order entry, although this pay type is reserved for delivery or retail pickup orders created through integration with the Order Broker.
• Use Locate Status Inquiry List Web Service (M05): Select this system control value to have pick slip generation use the status list request message rather than individual status inquiry request messages to check on whether retail pickup or delivery orders have been canceled by the originating system.
Overview: Use the cwdirectcp_locate.properties file for:
• WSDL Location (version 5.0 or higher)
• Endpoint URL’s (version 3.0 or 3.1)
• Setting the Daily Status Inquiry Time Window (all versions)
• Endpoint for Location Discovery Web Service
For more information: See Properties File Configuration for background.
Purchasing services properties: See Interface with Locate’s Supplier Direct Fulfillment Module: Overview and Setup for information on the additional entries in this properties file related to integration with Locate’s Supplier Direct Fulfillment module.
WSDL Location (version 5.0 or higher)

If you integrate with Locate version 5.0 or higher: Use the CW_LOCATE_SERVICES_WSDL_LOCATION entry in the properties file to specify the location of the WSDL (web service definition language). For example:
CW_LOCATE_SERVICES_WSDL_LOCATION=http://SERVER:8080/LOCATE/LocateServices?WSDL
where SERVER is the name of the server where Locate is running and LOCATE is the name of the Locate database and the account specified in the Locate Account (K49) system control value.
Also required for Supplier Direct Fulfillment integration: You need to set this property as described above even if you integrate with Locate’s Supplier Direct Fulfillment module but not with Locate’s Order Broker module, or if you integrate with an earlier version of Locate for the Order Broker than you use for the Supplier Direct Fulfillment module.
Endpoint URL’s (version 3.0 or 3.1)
If you integrate with Locate version 3.0 or 3.1: Use the cwdirectcp_locate.properties file to specify the endpoint URL’s for the web service that manages communication between the two systems. URL-related entries in this properties file are:
CW_GET_STATUS_SERVICE_ENDPOINT_URL=http://SERVER/LOCATE/service/locate.asmx
CW_GET_LOCATION_SERVICE_ENDPOINT_URL=http://SERVER/LOCATE/service/locate.asmx
CW_SEND_STATUS_SERVICE_ENDPOINT_URL=http:/SERVER/LOCATE/service/locate.asmx
CW_SEND_ORDER_SERVICE_ENDPOINT_URL=http://SERVER/LOCATE/service/locate.asmx
CW_FULFILLMENT_SERVICE_ENDPOINT_URL=http://SERVER/LOCATE/service/locate.asmx
where SERVER is the name of the server where Locate is running and LOCATE is the name of the Locate database and the account specified in the Locate Account (K49) system control value.
Setting the Daily Status Inquiry Time Window (all versions)
Applies to retail pickup and ship-to-store orders: For certain Order Broker statuses, it is not necessary to send a status inquiry as frequently as the Order Broker Status Update Interval (K10), because no immediate action is required in CWSerenade. These statuses apply to retail pickup or ship-to store orders:
• In transit: the order has been shipped to the store location
• received: the order has been received at the store location, but the customer has not yet picked it up
• partially fulfilled: the customer has picked up some of the items, or quantity of items on the order, but has not yet received the entire order
In order to avoid sending unnecessary status inquiry messages for orders in these statuses, the BROKER process checks their status once daily during a specified time window. It uses the following two additional properties to determine the start and end of the window:
• CW_LIMITED_STATUS_BEG_TIME=123456
• CW_LIMITED_STATUS_END_TIME=123456
Each time is indicated in HHMMSS format, military time. For example, if you set these properties to:
CW_LIMITED_STATUS_BEG_TIME=180000
CW_LIMITED_STATUS_END_TIME=210000
Then the BROKER process can send status inquiry requests for these orders between 6:00 p.m. and 9:00 p.m. daily. Orders are eligible for status inquiry if one has not taken place in the previous 12 hours.
You should set the time window long enough to process status inquiries for all orders in the related statuses; also, the time window should not cross midnight.
Use the following entry to specify the message version to include in Order Broker and merchandise locator request messages that CWSerenade sends to Locate:
CW_LOCATE_MESSAGE_VERSION=5.0
Set this property to 3.0 or 3.1 if you integrate with Locate version 3.0 or 3.1; otherwise, set this property to 5.0 or higher, based on the corresponding Locate version.
Required for status list request and streamlined allocation: A message version of 5.0 or higher is required to use the status list request message and streamlined allocation at pick slip generation. See Use Locate Status Inquiry List Web Service (M05) and Use Streamlined Allocation (L63) for background.
Important: To avoid unpredictable results, do not leave the CW_LOCATE_MESSAGE_VERSION blank.
Endpoint for Location Discovery Web Service
Use the CW_LOCATE_DISCOVERY_SERVICES_WSDL_LOCATION entry in the cwdirectcp_locate.properties file to identify the endpoint for the location discovery web service, used to create new Store Cross Reference records in CWSerenade based on existing location records in Locate. This entry should be set to http://SERVER:8080/Locate/DiscoveryServices?WSDL, where SERVER is the name of your Locate server.
For more information: See Importing Store Cross Reference Locations through Locate’s Discovery Web Service.
Additional Locate Setup in CWSerenade
Purpose: Additional setup for integration with Locate is described below:
General Locate setup:
• Unselect the Locate eligible flag for any items that should not be included in the Locate integration. This flag is selected by default.
• Complete the Locate location for each warehouse that maps to a location in Locate. If the Send Inventory by Warehouse to Locate (L06) system control value is selected:
• the product import process sends inventory information separately for each warehouse that has a Locate location specified.
• the BROKER process sends a separate fulfillment request message for each warehouse that has a Locate location specified.
Order Broker setup:
• BROKER process in Working with Integration Layer Processes (IJCT):
• Set up any trigger rules for brokered backorders. The fields in the Item (INITEM) and SKU (INSKU) tables are available for trigger rule setup.
• Optionally, set the Outbound delay time. The Outbound delay time controls how often to send fulfillment request messages.
• Secured features:
• Use the Cancel Order Broker Lines (B19) secured feature to restrict access to Order Broker cancellations as needed.
• Use the Maintain Brokered Fulfillment Orders (B20) secured feature to restrict access to order maintenance for retail pickup or delivery orders.
• Store cross references: Create store location cross references for each potential fulfilling location through Work with Store Cross Reference (WSCR), including:
• optionally, specify a source code for any store location to send retail pickup or delivery orders to CWSerenade as an override to the Order Broker Source Code (K93). If the fulfillment response message specifies a source code, it overrides any source code specified in the system control value or the store cross reference.
• for ship-to-store orders, select the Ship to store flag; also, complete the description and address fields, as this information is used as the ship-to name and address for ship-to-store orders.
• optionally, specify a System Code to override the System Name in Locate for Point of Sale (L09) used to identify the fulfilling location for ship-to-store and store pickup orders
Note: You can use the Importing Store Cross Reference Locations through Locate’s Discovery Web Service option to create store cross reference records.
• BROKER periodic function: Set up and schedule the BROKER periodic function (program PFR0083) to generate requests for existing backordered lines.
Note: Since the BROKER periodic function should not run at the same time as pick slip generation, the periodic function runs in the PICKGEN queue regardless of your selection for the periodic process.
• Schedule BROKER process: Optionally, set up periodic functions to schedule the BROKER process in Working with Integration Layer Processes (IJCT):
• ENDBROK (program=ILENDBROKR) to stop the BROKER process
• STRBROK (program=ILSTRBROKR) to start the BROKER process
• CWPickOut: If you use the CWPickOut message to send pick slip information from CWSerenade to an external system, set the Outbound XML version of the PICK_OUT process in Working with Integration Layer Processes (IJCT) to 3.0 or higher to include:
• broker_delivery_type of R (retail pickup), D (delivery), or S (ship-to-store)
Note: This field is not used for brokered backorders.
• destination_store: the store cross-reference code (WSCR) for a ship-to-store order
• originating_store: the store cross-reference code (WSCR) for a retail pickup or delivery order
• CWInvoiceOut: If you use the CWInvoiceOut message to send invoice information to an external system, set the Outbound XML version of the INVOIC_OUT process in Working with Integration Layer Processes (IJCT) to 2.0 or higher to include:
• ost_broker_delivery_type of R (retail pickup), D (delivery), or S (ship-to-store)
Note: This field is not used for brokered backorders.
• ost_destination_store: the store cross-reference code (WSCR) for a ship-to-store order
• ost_originating_store: the store cross-reference code (WSCR) for a retail pickup or delivery order
• Email setup: Use the Email notification flag to control email generation for the retail pickup, delivery, or store pickup order types. Also, set up the store pickup notification template. See Email Generation Setup for more information.
Merchandise locator setup: For merchandise locator searching: Make sure the MERCH_LOC process in Working with Integration Layer Processes (IJCT) has its Communication type field set to Web Service.
Notes on Configuration in Locate
Follow the steps described under Setting Up Data in Locate in the Locate online help or operations guide, using the following notes to configure the integration between Locate and CWSerenade:
System setup:
• Default system? If CWSerenade is the default system for your organization, set the Locate Product Code ID (I66) system control value in CWSerenade to Item/SKU or blank. Otherwise, if CWSerenade is not your default system, use the Locate Product Code (I66) system control value to indicate the field you use to store each item’s product code from the default system.
• Setting up the CWSerenade system: Also, when creating the CWSerenade system in Locate:
• Set the System code in Locate to match the Company number in CWSerenade and the Locate System (K50) system control value. The code should not be zero-padded (that is, create a system of 2 rather than 002).
• Select the Online flag.
• Set the Connection type to Direct DB.
• In the Connection string field, enter Server=SERVERNAME;Initial Catalog=CWSerenade_db;Uid=user;Pwd=password; where SERVERNAME is the name of your database server, CWSerenade_db is the name of your CWSerenade database, and user and password are a valid user ID and password for the database server.
Warehouse (location) setup:
• Create a location in Locate to represent your default warehouse in CWSerenade. The location code in Locate should match the warehouse number in CWSerenade, and should not be zero-padded (that is, create a warehouse of 1 rather than 0001).
• At the Preferences screen in Locate, flag the default CWSerenade location, and any additional locations representing CWSerenade warehouses, as Pickup available = No. (NOTE: You can set this flag at the location type level if you have set up a location type to represent your CWSerenade warehouses; in this case, you do not need to set the flag for each individual location.)
Note: See the Locate online help for additional steps to setting up data in Locate.
Product and inventory import setup: Use the System Import Schedule screen to set up a schedule for importing items and inventory information from CWSerenade into Locate. When setting up the schedule:
• Select the Enabled flag.
• Set the Import Process Type to Extract and Import.
• If CWSerenade is your default system, make sure to schedule its import process about 30 minutes earlier than any other systems to prevent product import errors. The product import will fail if you attempt to create a system product record before the product record for the default system exists.
Note: MICROS recommends that you schedule the product and inventory import so that it occurs after the purchase order layering process completes. See Purchase Order Layering for more information.
